
Easy Chocolate Valentine Cookies with Heart Decorations
A Simple, No-Fuss Recipe for Festive Valentine’s Day Treats
Transform basic pantry ingredients into gorgeous Valentine’s Day treats with this foolproof chocolate Valentine cookie recipe. These soft, fudgy cookies feature a rich cocoa base topped with colorful candy hearts or festive sprinkles—no piping bags or icing skills required. Perfect for class parties, gift boxes, or a sweet surprise for someone special.
The genius of this method lies in pressing decorations directly into the raw dough before baking. The heat sets everything in place, creating professional-looking results that stay put (unlike sprinkles scattered on top of traditional sugar cookies). Plus, the deep chocolate color cleverly hides any minor imperfections in shape or decoration placement.
Table of Contents
Why This Valentine Cookie Recipe Works
This recipe solves the biggest challenges home bakers face when making decorated holiday cookies:
- No specialized decorating skills needed: Skip the piping tips, food coloring, and royal icing tutorials. Simply press your chosen decorations into the dough and bake.
- Kid-friendly preparation: Even young children can help form dough balls and add toppings, making this an ideal family activity for Valentine’s Day preparations.
- Decorations that actually stick: The press-in method ensures sprinkles and candy hearts stay securely attached through baking, storage, and transport—essential for classroom treats or gift packaging.
- Rich chocolate flavor: Dutch-process cocoa creates an intensely chocolatey cookie with a tender, fudgy texture that tastes far more sophisticated than the simple ingredient list suggests.
Recipe Quick Facts
- Prep time: 15 minutes
- Baking time: 8-10 minutes per batch
- Yield: Approximately 30 cookies
- Skill level: Beginner-friendly
- Equipment needed: Mixing bowl, baking sheets, parchment paper
Essential Ingredients and Substitutions
For the Cookie Dough
- 1 cup butter, softened to room temperature (not melted)
- 1 cup granulated white sugar
- ½ cup packed brown sugar
- 2 large eggs, at room temperature
- 1 teaspoon pure vanilla extract
- 2 ¼ cups all-purpose flour
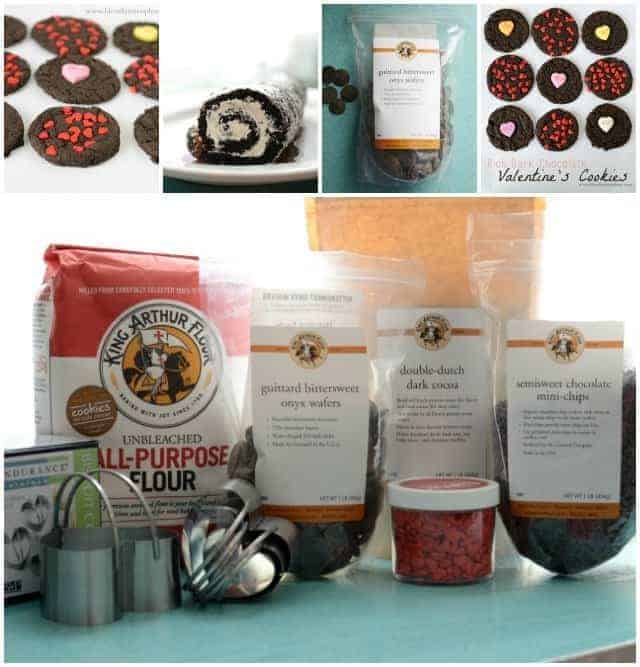
- ⅔ cup Dutch-process cocoa powder (see notes)
- 1 teaspoon baking soda
- ¼ teaspoon salt
For Decoration
- Valentine-themed sprinkles (heart shapes, red and pink jimmies, or nonpareils)
- Large conversation hearts (classic size, not mini)
Key Ingredient Notes
Dutch-Process Cocoa: This alkalized cocoa powder produces a darker color and smoother, less acidic flavor than natural cocoa. King Arthur Baking’s Double-Dark Dutch Cocoa delivers exceptional results, though any Dutch-process variety works well. Don’t substitute natural cocoa, as it will affect both taste and texture.
Butter Temperature: Softened butter should yield easily to gentle pressure but maintain its shape. If it’s greasy or melted, your cookies will spread excessively. Leave butter at room temperature for 30-60 minutes, or microwave in 5-second bursts if you’re short on time.
Conversation Hearts Sizing: Standard-sized conversation hearts (about ¾ inch across) sit perfectly on top of cookies. Mini versions sink into the dough during baking and virtually disappear. If you can only find mini hearts, consider using them in clusters of 2-3 per cookie.
Sprinkle Shopping Strategy: Purchase Valentine decorations in early January before stores sell out. High-quality baking sprinkles (from brands like Wilton or Sweetapolita) contain more vibrant colors and crunchier textures than generic grocery store varieties.
Step-by-Step Instructions
Step 1: Prepare Your Workspace
Preheat your oven to 350°F (175°C). Line two baking sheets with parchment paper or silicone baking mats. This prevents sticking and ensures even heat distribution. If you only have one baking sheet, you’ll need to bake in multiple batches, keeping remaining dough refrigerated between rounds.
Step 2: Cream Butter and Sugars
In a large mixing bowl or the bowl of a stand mixer, combine the softened butter, granulated sugar, and brown sugar. Beat on medium-high speed for approximately 3 minutes until the mixture becomes noticeably lighter in color and fluffy in texture. This creaming process incorporates air, creating tender cookies with a delicate crumb.
Step 3: Add Wet Ingredients
Crack in the eggs one at a time, beating well after each addition. Pour in the vanilla extract and mix until everything is thoroughly combined and the mixture looks smooth. Scrape down the sides of the bowl with a rubber spatula to ensure even mixing.
Step 4: Incorporate Dry Ingredients
Add the flour, cocoa powder, baking soda, and salt directly to the wet ingredients. Mix on low speed (or stir by hand) just until no dry streaks of flour remain. Overmixing at this stage can lead to tough, dense cookies. The dough will be thick and slightly sticky—this is exactly what you want.
Step 5: Shape and Decorate
Scoop portions of dough and roll between your palms to form balls measuring 1 to 1½ inches in diameter (roughly the size of a walnut). For consistent sizing, use a cookie scoop—a 1.5-tablespoon scoop produces perfectly uniform cookies.
For sprinkle-topped cookies: Pour your chosen sprinkles into a small, shallow bowl. Gently press the top of each dough ball into the sprinkles, then use your fingertips to press them firmly into the dough surface. Place decorated-side-up on your prepared baking sheet, spacing cookies about 2 inches apart.
For conversation heart cookies: Place plain dough balls on the baking sheet first. Use the flat bottom of a drinking glass or measuring cup to gently flatten each ball to about ½-inch thickness. Press a conversation heart into the center of each cookie, applying enough pressure that it adheres but doesn’t sink below the surface.
Step 6: Bake to Perfection
Bake for 8-10 minutes. The cookies are done when the centers appear set and no longer look wet or shiny. Because of the dark chocolate color, visual cues are subtle—rely on timing and the gentle touch test. Lightly press the center of a cookie; it should spring back slightly rather than leave an indentation.
Step 7: Cool Properly
Let cookies rest on the baking sheet for 2-3 minutes. This brief cooling period allows them to set up enough to move without breaking. Transfer to a wire cooling rack using a spatula and allow to cool completely before storing or serving—approximately 30 minutes.
Common Problems and Solutions
Cookies spread too thin during baking: Your butter was likely too warm, or your dough needs chilling. Refrigerate the shaped dough balls for 30 minutes before baking. Also verify you’re measuring flour correctly—spoon it into your measuring cup rather than scooping directly from the bag, which compacts it and results in less flour than needed.
Decorations fall off after baking: Press sprinkles and candy hearts more firmly into the dough before baking. The dough needs to envelope the bottom portion of each decoration. If using particularly heavy decorations, try slightly flattening the dough ball first to create a sturdier base.
Centers remain underbaked while edges overcook: Your oven likely runs hot. Reduce temperature to 340°F and extend baking time by 1-2 minutes. Invest in an oven thermometer to verify accuracy—many home ovens run 25°F hotter or cooler than their dial indicates.
Cookies turn out hard instead of soft: Overbaking is the most common culprit. Because these cookies are dark, it’s difficult to judge doneness by color. Set a timer and remove them the moment centers appear set. They’ll continue cooking slightly as they cool on the baking sheet.
Creative Variations to Try
- White Chocolate Drizzle: Once cookies cool completely, melt white chocolate chips and drizzle over tops using a fork or piping bag. Add a few extra sprinkles while the chocolate is still wet.
- Peppermint Twist: Add ¼ teaspoon peppermint extract to the dough along with the vanilla. Top with crushed candy canes instead of conversation hearts.
- Sandwich Cookie Version: Bake cookies without decorations. Once cooled, sandwich pairs together with your favorite filling—buttercream frosting, Nutella, marshmallow fluff, or cream cheese frosting all work beautifully.
- Vanilla Sugar Cookie Alternative: Omit the cocoa powder and add an additional ⅔ cup flour. This creates classic vanilla sugar cookies that showcase decorations even more prominently.
- Gluten-Free Version: Substitute a 1:1 gluten-free flour blend for regular all-purpose flour. The texture will be slightly more crumbly but still delicious. Add 1 teaspoon xanthan gum if your blend doesn’t include it.
Storage and Make-Ahead Instructions
Room Temperature Storage
Store completely cooled cookies in an airtight container at room temperature for up to 5 days. Layer cookies between sheets of parchment paper to prevent sticking. Keep container away from direct sunlight or heat sources to maintain freshness.
Freezing Baked Cookies
Freeze baked cookies for up to 3 months. Arrange in a single layer on a baking sheet and freeze until solid (about 1 hour), then transfer to freezer-safe bags or containers. This prevents cookies from sticking together. Thaw at room temperature for 30 minutes before serving.
Freezing Cookie Dough
For ultimate convenience, freeze shaped dough balls before baking. Form balls, place on a baking sheet, and freeze until solid. Transfer to freezer bags and store for up to 3 months. Bake directly from frozen, adding 1-2 extra minutes to the baking time. Add decorations just before baking.
Refrigerating Dough
Mixed dough can be refrigerated for up to 3 days in an airtight container. This actually improves flavor as ingredients meld together. Let dough sit at room temperature for 10-15 minutes before shaping if it becomes too firm to work with.
Serving Ideas and Pairings
These chocolate Valentine cookies shine in numerous serving scenarios:
- Arrange on a platter with fresh strawberries and raspberries for an elegant dessert board
- Package individually in cellophane bags tied with ribbon for classroom valentines or party favors
- Serve alongside vanilla ice cream or whipped cream for an indulgent dessert
- Pair with cold milk, hot chocolate, or coffee for afternoon snacking
- Create a Valentine’s dessert table with pink lemonade, chocolate-covered strawberries, and these cookies as the centerpiece
Frequently Asked Questions
Can I use regular cocoa powder instead of Dutch-process?
While possible, it’s not recommended. Natural cocoa powder has higher acidity, which reacts differently with baking soda and produces a lighter color and tangier flavor. For best results, stick with Dutch-process cocoa.
How can I prevent cookies from spreading too much?
Chill shaped dough balls for 30 minutes before baking if your kitchen is warm. Ensure butter is properly softened (not melted) and accurately measure flour by spooning it into measuring cups rather than scooping.
Can I decorate these with royal icing instead?
Absolutely! Bake cookies plain and let them cool completely. Royal icing adheres perfectly to the chocolate surface. This method works especially well if you want to create intricate designs or personalized messages.
What’s the best way to achieve uniform cookie sizes?
Use a cookie scoop or ice cream scoop for consistent portioning. A 1.5-tablespoon scoop creates perfectly sized cookies that bake evenly. If you don’t have a scoop, weigh dough portions—each should be approximately 25-30 grams.
My cookies came out cakey instead of fudgy. What happened?
This usually indicates too much flour. Next time, measure by spooning flour into the cup and leveling off with a knife. You might also try slightly underbaking—removing cookies when centers barely look set creates a fudgier texture.
Nutritional Information (Per Cookie)
Based on a yield of 30 cookies:
- Calories: 137
- Total Carbohydrates: 19g
- Protein: 2g
- Total Fat: 7g (4g saturated)
- Cholesterol: 27mg
- Sodium: 110mg
- Sugar: 10g
Expert Tips for Success
- Bring eggs and butter to room temperature 30-60 minutes before baking. Room temperature ingredients mix more evenly, creating better texture.
- Don’t skip the cooling time on the baking sheet. Those 2-3 minutes allow cookies to firm up enough to transfer without breaking.
- Rotate baking sheets halfway through if your oven has hot spots. This ensures even browning and prevents some cookies from overbaking.
- Work quickly when decorating dough balls. If dough becomes too warm, it becomes sticky and difficult to handle. Refrigerate briefly if needed.
- Use parchment paper or silicone baking mats rather than greasing pans. This prevents excess spreading and makes cleanup effortless.
Final Thoughts
These easy chocolate Valentine cookies prove that impressive holiday treats don’t require advanced baking skills or specialized equipment. The press-in decoration method eliminates fussy piping work while still delivering gorgeous, festive results that taste as good as they look.
Whether you’re baking with children, preparing classroom treats, or simply craving a chocolate indulgence for Valentine’s Day, this recipe delivers consistent, crowd-pleasing results. The rich cocoa flavor, tender texture, and colorful decorations make every batch feel special.
Start a new tradition this Valentine’s Day—one that fills your kitchen with chocolate aroma and creates sweet memories with the people you love. Happy baking!

Easy Chocolate Valentine Cookies with Heart Decorations
Ingredients
- 1 cup butter softened
- 1 cup granulated sugar
- ½ cup brown sugar
- 1 teaspoon vanilla extract
- 2 eggs
- 2 ¼ cups all-purpose King Arthur Flour
- ⅔ cups King Arthur’s Flour double-dark Dutch cocoa
- 1 teaspoon baking soda
- ¼ teaspoon salt
- Valentine sprinkles and/or large conversation hearts
Instructions
- Preheat the oven to 350° and line a baking sheet with parchment paper or a baking mat.
- In a large bowl or the bowl of your stand mixer beat together the butter and sugars until light and fluffy, about 3 minutes.
- 1 cup butter,1 cup granulated sugar,½ cup brown sugar
- Add the vanilla and eggs and beat to combine well.
- 1 teaspoon vanilla extract,2 eggs
- Add the flour, cocoa, soda, and salt and stir to combine.
- 2 ¼ cups all-purpose King Arthur Flour,⅔ cups King Arthur’s Flour double-dark Dutch cocoa,1 teaspoon baking soda,¼ teaspoon salt
- Form the dough into 1 to 1 ½-inch balls. Dip the top of the ball into the heart sprinkles and then lightly press the sprinkles into place. Place on the cookie sheet.
- Valentine sprinkles and/or large conversation hearts
- For the conversation heart cookies, form the dough into 1 to 1 ½-inch balls and place on the cookie sheet. With the bottom of a glass of measuring cup slightly flatten the dough ball. Place a conversation heart in the center of the dough and press lightly to get it to stick into the dough.
- Bake the cookies for 8 to 10 minutes until the centers are set. Let the cookies cool on the pan for 2 or 3 minutes and then place them on a wire rack.
- Store extra cookies in an air-tight container.

One Comment