
Baby’s First Birthday Smash Cake: Simple 4-Inch Chocolate Cake Recipe
Making Baby’s First Birthday Magical
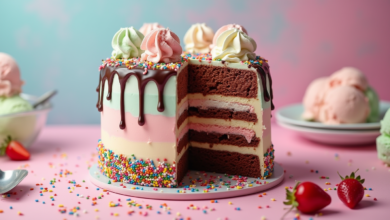
Planning your little one’s first birthday celebration? A miniature smash cake creates picture-perfect moments while giving your baby their own special treat to explore. This single-serving chocolate cake measures just four inches across—perfectly proportioned for tiny hands to grab, squeeze, and yes, smash during this milestone celebration.
Unlike traditional layered birthday cakes, this streamlined recipe produces a compact, grabbable dessert that bakes in a single pan. The result? A delightful chocolate treat topped with smooth cream cheese frosting that photographs beautifully while being completely baby-friendly.
Table of Contents
What Makes This Smash Cake Special
Perfectly Portioned
This miniature cake measures exactly 4 inches in diameter, making it ideal for small hands without creating excessive waste. The single-layer design means no complicated assembly—just bake, frost, and celebrate.
Quick Preparation
From mixing bowl to cooling rack in under 30 minutes total. The straightforward method uses basic pantry ingredients without requiring specialty equipment or advanced baking skills.
Customizable Decoration
Whether you’re planning a rainbow unicorn theme or simple elegant styling, this neutral chocolate base accepts any color scheme or decoration style you envision.
Dietary Friendly Options
The base recipe contains no eggs or dairy, making substitutions simple for families with dietary restrictions or allergies.

Essential Ingredients Breakdown
For the Cake Base
- All-purpose flour (⅓ cup plus 1 tablespoon): Provides structure without making the cake dense
- Granulated sugar (¼ cup): Adds sweetness and helps create a tender crumb
- Unsweetened cocoa powder (1 tablespoon): Delivers rich chocolate flavor
- Baking soda (¼ teaspoon): Creates lift and helps the cake rise
- Fine salt (⅛ teaspoon): Enhances chocolate flavor and balances sweetness
- Hot water (¼ cup): Activates cocoa and creates moisture
- Vegetable oil (2 tablespoons): Keeps the cake tender and prevents drying
- White vinegar (1 teaspoon): Reacts with baking soda for extra lift
- Pure vanilla extract (⅛ teaspoon): Adds depth to chocolate flavor
For the Frosting
Use approximately ½ cup of your preferred frosting. Popular choices include:
- Cream cheese frosting (recommended for tangy sweetness)
- American buttercream for stability in warm weather
- Whipped cream frosting for lighter texture

Step-by-Step Baking Instructions
Preparation Phase
- Set oven temperature to 350°F (175°C) and position the rack in the center
- Prepare your pan by coating a 4×2-inch round cake pan thoroughly with baking spray or butter and flour
- Gather ingredients and measuring tools to streamline the process
Mixing the Batter
- Combine dry ingredients in a small mixing bowl: flour, sugar, cocoa powder, baking soda, and salt. Whisk together until evenly distributed with no lumps visible.
- Mix wet ingredients in a measuring cup or small bowl: hot water, vegetable oil, vinegar, and vanilla extract. Stir until combined.
- Create the batter by pouring wet ingredients into the dry mixture. Whisk gently just until no flour streaks remain—avoid overmixing, which can create a tough texture.
Baking Process
- Pour batter into your prepared pan, using a spatula to scrape every bit from the bowl
- Bake for 18-20 minutes until a toothpick or cake tester inserted in the center emerges clean
- Cool in pan for 5 minutes, then invert onto a wire cooling rack
- Wait for complete cooling before frosting—approximately 30-45 minutes at room temperature
Frosting and Decoration Techniques
Creating a Smooth Base
Start with a completely cooled cake to prevent frosting from melting. Place a generous dollop of frosting on top and use an offset spatula or butter knife to spread it across the surface and down the sides.
The Crumb Coat Method
For professional-looking results, apply a thin initial layer of frosting to seal in crumbs. Refrigerate for 15 minutes, then apply your final frosting layer for a smooth, clean finish.
Simple Decoration Ideas
For Beginners:
- Press rainbow sprinkles around the bottom edge for instant color
- Create simple swirls on top using the back of a spoon
- Add a single candle as the focal point
Intermediate Options:
- Pipe rosettes around the top edge using a star piping tip
- Create an ombre effect with different colored frosting layers
- Add fresh berries or edible flowers for natural decoration
Theme Matching:
- Use colored frosting to match party decorations
- Add character toppers or themed sprinkles
- Pipe baby’s name or “ONE” on top
Frequently Asked Questions
Can I prepare this cake in advance?
Absolutely. Bake the unfrosted cake up to two days ahead and store it wrapped tightly in plastic wrap at room temperature. Add frosting and decorations on the day of the party for best results. Fully decorated cakes can be refrigerated overnight—just allow 60 minutes at room temperature before serving.
How should I transport this to another location?
Chill the decorated cake for at least two hours before transport to firm up the frosting. Place it in a tall container or box (minimum 8 inches high) with a non-slip mat underneath. Keep your vehicle air-conditioned to prevent frosting from softening during transit.
What frosting works best in hot weather?
American buttercream holds up better than cream cheese frosting in warm conditions. For outdoor summer celebrations, consider Swiss meringue buttercream, which contains less sugar and maintains stability in heat.
Can I make this vanilla instead of chocolate?
Yes! Omit the cocoa powder and increase the flour to ½ cup total. All other ingredients remain the same.
Is this recipe safe for babies?
The cake itself contains no honey, nuts, or common allergens (no eggs, no dairy). However, check with your pediatrician about introducing new foods, especially regarding the frosting which typically contains dairy.
Professional Tips for Success
Achieving the Perfect Texture
- Measure flour correctly by spooning it into the measuring cup and leveling off—don’t pack it down
- Don’t overmix the batter; stop whisking as soon as flour disappears
- Use hot (not warm) water to properly activate the cocoa powder
- Allow ingredients to reach room temperature for even mixing
Handling the Dome
Cakes naturally dome as they bake. You have two options:
- Leave the rounded top for a rustic, homemade appearance
- Level it with a serrated knife for easier frosting and a professional finish
Storage Guidelines
- Unfrosted cake: Room temperature for 2 days, refrigerated for 5 days, frozen for 2 months
- Frosted cake: Refrigerated for 3 days (cream cheese frosting) or 4 days (buttercream)
- Bring refrigerated cakes to room temperature before serving for best flavor
Making It Picture-Perfect
The smash cake creates memorable photos, so consider these tips:
- Use a high chair with a removable tray for easy cleanup
- Place a splat mat or disposable tablecloth underneath
- Ensure good lighting—natural light near a window works beautifully
- Have your camera ready before placing the cake
Complementary Birthday Treats
For Party Guests
Consider preparing additional desserts for adult guests and older children:
- Standard-sized cupcakes in matching flavors
- Individual cheesecake jars for an elegant touch
- Sheet cake to serve larger crowds easily
Alternative Flavor Ideas
Once you’ve mastered this recipe, experiment with:
- Vanilla cake with strawberry frosting
- Funfetti cake with vanilla buttercream
- Carrot cake with cream cheese frosting
- Lemon cake with lemon curd filling
Why This Recipe Works
The magic lies in the precise ratios and ingredient interactions:
The vinegar and baking soda create a chemical reaction that produces carbon dioxide, giving the cake lift without eggs.
Hot water helps bloom the cocoa powder, intensifying the chocolate flavor and creating a more moist texture.
Vegetable oil instead of butter keeps the cake tender for several days and ensures it stays soft even when refrigerated.
Minimal mixing prevents gluten development, resulting in a delicate, tender crumb that’s perfect for little ones.
Scaling This Recipe
Making Multiple Cakes
Simply multiply all ingredients by the number of cakes needed. Each cake uses the same measurements, so doubling or tripling is straightforward.
Creating Larger Cakes
To make a 6-inch cake, double the recipe. For an 8-inch cake, triple it. Adjust baking time by adding 5-10 minutes and testing with a toothpick.
Troubleshooting Common Issues
Cake is too dense: Possible overmixing or old baking soda. Replace leavening agents every 6 months for best results.
Cake stuck in pan: Ensure thorough greasing or use parchment paper. Let cool 5 minutes before inverting.
Dome is excessive: Oven temperature may be too high. Verify with an oven thermometer for accuracy.
Cake is dry: Overbaking is the likely culprit. Start checking at 18 minutes and remove as soon as the tester comes clean.
Final Thoughts
This miniature chocolate smash cake combines simplicity with celebration, creating a memorable milestone moment without requiring professional baking skills. The straightforward recipe, quick preparation time, and endless decoration possibilities make it ideal for busy parents planning a first birthday party.
Whether you keep decorations minimal or go all out with themed designs, this personal-sized cake allows your little one to experience their own special dessert while creating photographs you’ll treasure forever. The mess is part of the memory—embrace it and enjoy watching your baby discover the joy of cake for the first time.

Baby’s First Birthday Smash Cake
Ingredients
Cake:
- ⅓ cup plus 1 tablespoon all-purpose flour
- ¼ cup granulated sugar
- 1 tablespoon unsweetened cocoa powder
- ¼ teaspoon baking soda
- ⅛ teaspoon fine salt
- ¼ cup hot water
- 2 tablespoons vegetable oil
- 1 teaspoon white vinegar
- ⅛ teaspoon vanilla extract
Frosting:
- ½ cup cream cheese frosting or frosting of choice
- Sprinkles and decorations as desired
Instructions
- Preheat oven to 350°F. Thoroughly grease a 4×2-inch round cake pan with baking spray.
- Whisk together flour, sugar, cocoa powder, baking soda, and salt in a small bowl until evenly combined.
- Mix hot water, oil, vinegar, and vanilla in a measuring cup.
- Pour wet ingredients into dry ingredients and whisk just until smooth with no flour streaks visible.
- Pour batter into prepared pan and bake 18-20 minutes until a tester inserted in the center comes out clean.
- Cool in pan 5 minutes, then invert onto a wire rack to cool completely before frosting.
- Frost with cream cheese frosting and decorate as desired.
Notes
- Cake can be baked 2 days ahead and stored wrapped at room temperature
- For vanilla version, omit cocoa and increase flour to ½ cup
- Adjust baking time if using a different size pan
- Recipe easily doubles or triples for multiple cakes
This recipe creates one 4-inch smash cake perfect for baby’s first birthday celebration. The simple chocolate cake with customizable frosting makes milestone photos memorable while giving your little one their own special treat to explore.
One Comment